Quake - Lesson 5 - Liquid Brushes
Note: if you've never used BSP before, I suggest
that you review some of my
General BSP tutorials to get a feel for using the
editor. These tutorials for Quake-specific items will be geared to people who are already comfortable
with BSP.
Remember when I told you that all Quake brushes
were solid? Well, that's true except for 3 cases: Water, Lava and
Slime. These are the only types of brushes that the player can
actually be inside (for a brief period anyway). This lesson will show
you how to use create these liquid brushes. It's really not hard, so
this will be a fairly short lesson. Be sure you have a map file
from a previous lesson available. If you don't have one, you
can use
this file.
Liquid Brushes are created in the same way as
normal brushes. They become liquid when you assign a liquid texture to
them. In the QUAKE101.wad file, the liquid textures are: *LAVA1,
*LAVA2, *SLIME1, *SLIME2, *WATER0, *WATER1, *WATER2. There is also a
*WATER3 texture available in Quake, but for some reason it's not
included in QUAKE101.wad. Simply by
applying one of these textures to a brush, you make it liquid. Pretty
easy, huh? Actually, the *TELEPORT texture is treated as a liquid
texture by Quake also; just in case you were wondering...
Let's add a pit to our map and I'll show
you how to make a liquid brush. Easy as it is, there are a couple of
things to look out for. Start out in the Top View and draw a new brush
from (-832, -64) to (-448, -192). Switch to the Front View and drag
the bottom of your brush to -80 on the Z axis. Drag the top of the
brush to 8. Now since we want to make a hole in the floor for our pit,
subtract this brush from the world, but don't delete it.
Once you've subtracted the brush, drag the top of
this new brush down so that it is level with the floor of the room (0
on the Z axis). While it's still selected, let's go ahead and apply a
texture to this brush. I've chosen 'WALL3_4' for a texture. That way
when we make this brush into a pit, it will look like it was dug out
of the rock under our room. Select the top face of the brush and apply
'FLOOR01_5' to the top face only. That way it will blend in with the
rest of the floor.
Now let's hollow out our pit. In the Top view, draw
a new brush from (-824, -72) to (-456, -184). Switch to the Front view
again and set the top of the brush at 8 and the bottom at -72. Once
you've gotten the brush positioned correctly, go ahead and subtract
it, but again, don't delete it. After the brush is subtracted, drag
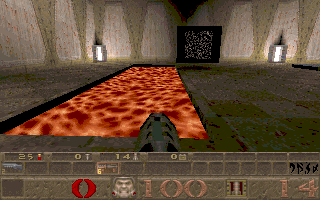
the top edge down to -8 and apply '*LAVA1' for a texture.
We're ready to compile our map. Go ahead and
compile your map and run it in Quake. Here's what you should see:
Of course, you can make a slime brush the same way
we just made our lava brush; just select one of the slime textures
instead of the one we used. We could do that here, but let's change
the texture to '*WATER0' instead. That will make our pit into a
swimming pool. Go ahead and change the texture on this brush and while
we're at it, let's add a light down in the water, so we can see where
we're swimming. Make a couple of light entities (I gave mine a 150
value) and space them throughout the water. Now, recompile your map
and take a look. This time it looks a little more inviting:


There are two views: One from above and one from
underwater. Notice that the floor texture of the room is also the
floor of our pit. This is because it was the texture of the top face
of the brush we used to carve the pit. It carried over to this brush
automatically.
All right, now remember in the last lesson, we
learned how to use the 'trigger_push' entity to make a wind tunnel?
Well, we can use this same entity to make a current in our pit. This
would be great to simulate an underground river. Let's do that now. In
the Top view, draw a brush from (-816, -80) to (-464, -176). In the
Front view, set the top of the brush at -64 and the bottom at -72. Now
make this entity into a 'trigger_push' entity. Set the angle to 180
and assign a key/value pair of 'speed' '7'. That's pretty slow, but we
don't want the player to be shooting the rapids after all do we? Any
faster and the player can't move against the current. As it is, the
player can move, but it's a struggle.
Re-compile your map and jump into the pit. The
current will carry you across the room, but you can swim against the
current if you want. When you're done playing, jump out of the water
to leave the pit. Pretty cool!
Well that wraps up this lesson. See, I told you this
would be a short one. Before we finish up, though, there is one
more thing you need to know about liquid brushes. As you know in
Quake, you can set the texture of each face on a brush individually.
However, this doesn't apply to liquid brushes. They must have all
faces the same texture or QBSP will generate an error and your map
won't compile. If you ever see a message complaining about 'mixed
faces' in QBSP, this is probably the cause.
This site is designed for 800x600 resolution, and is best
viewed in Netscape 4.0 or above with 16bit color or higher.
BSP is the sole creation of
Yahn Bernier. I am only a
dedicated user, reporting news and making tutorials so Yahn can spend more
time enhancing BSP.
This web page was created and is being
maintained by me (DeadMeat). Unless otherwise noted, all content appearing on this site
was written by me. Also, 'DeadMeat's BSP Tutorials' were created entirely by me. All unauthorized use is
prohibited. (c) 1997. So there :-P