Lesson 10 - 3D Clipping with BSP
A Guest Tutorial by Gripp
Note: This tutorial was written by
Gripp (aka Mike
Ruete). If you don't know Gripp, he runs the #level_design channel on
#EFNET (drop by some time - I hang out there once in a while). He is
also really good at putting BSP through its paces. To see a sample of
his work check out
Rust
in Peace, a cool level he made. Anyway, he graciously agreed to
take time away from his busy schedule to write up a tutorial on using
the 3D clipping plane in BSP. (Thanks Gripp!!)
I've shown a little 2D clipping here and there throughout these
tutorials, but I haven't begun to show the power that exists in this
feature. Be warned: this is pretty technical stuff and takes a lot of
trial and error to get used to, so roll up your sleeves and let's dig
in. If you don't understand how to set clip points, you might be
better off checking out
Lesson 2
before you attempt this lesson. It demonstrates how to clip in 2D
planes and should give you enough info to get started.
I have added some comments here and there to Gripp's text to
help clarify some of the murkier points. My comments are in
this color to distinguish them from
Gripp's. So now, without further ado, heeeerrre's Gripp!
The 3-point clip plane in BSP kicks ass. But, to
use it effectively, one must first understand how 3 points define a
plane as it relates to 3D editing. In general math, a plane is just an
infinite set of points described by an equation. However, in 3D
games/editing, the notion that a plane has a front and a back is tossed
in, just to make things more complicated.
In BSP, when you use a clip plane, stuff "in front of"
the plane is kept, and stuff "behind" the plane is either
clipped away or split off into a new brush (depending which button you
hit). So, there are two main problems with using the 3-point clip plane:
- Getting the plane to point in the right
direction, and
- Getting the right plane (the right angle and
alignment with existing brushes)
Both of these problems can easily be overcome with
an efficient mode of thinking about the problem, and with lots of
practice. Here's a description of the mode of thought I use:
- 1 - Getting the plane to point in the right
direction, that is, getting it so that the stuff you want to keep is
in front, and the stuff you don't need, or want to split off, is
behind. Thankfully, BSP has a "flip clip plane" feature in
case you don't get this right the first time, but getting it right
the first time makes problem 2 easier to deal with. So, here's the
magic trick: If clipping the tops off a (set of) brushes, place your
points in clockwise order. If you're clipping the bottoms off, place
your points in counter-clockwise order. When I say "tops"
and "bottoms", it's really relative to the 2-dimensional
view you're placing the points in. However, I suggest placing your
points in the X/Y view until you get more used to it.
- 2 - Now that we now how to get the plane
oriented properly front to back, let's tackle the problem of getting
the correct plane. The key to this is knowing that a plane is
defined uniquely by 3 points that are on that plane (namely, the
clip points). However, also consider this: the plane which contains
the face of a polygon can be defined by any three vertices on the
face of that polygon. So, I suggest this: when you use the three
point clip plane, envision the face you're trying to create, and
place the clip points on vertices of that face. In practice, this is
a little difficult, and a three-step approach, involving the concept
of clock-wise or counter-clockwise placement, will make things
easier.
- Step 1: In your X/Y view, place three points
in clockwise or counter-clockwise order (see #1 above) at the
places where your vertices will be. As you place them, think to
yourself "1 up, 2 up, 3 down" or however appropriate
(more examples later).
- Step 2: Switch to a side view, and move
points 1, 2, and 3 to their "up" or "down"
position, as you thought of them while placing them.
- Step 3: Clip
Here are some examples of simple shapes, and how
you might going about creating them.
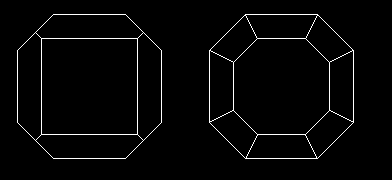
Shape One: The 1/4 spike
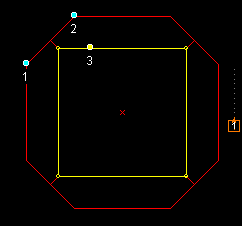
From the top, this looks like a triangle:
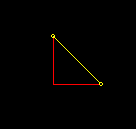
Follow these instructions, and see what you come up with:
- Make a 64x64x64 cubic brush.
- Clip it in the X/Y view from top-left to
bottom-right (to make the triangle you see above)
- BSP sets the 3rd coordinate of each clip point
to where the center of your 2D views are, so switch to a 2D view and
center the camera on the top of the box you created.
- Now, go back to the X/Y view and place the clip
points 1, 2, 3 in that order, and as you go, think to yourself "1
up, 2 down, 3 down".
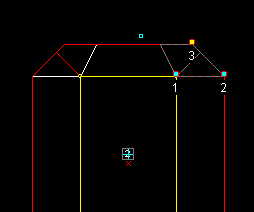
- Switch back to the side view and move point 1 to
the top of the box, and points 2 and 3 to the bottom of the box.
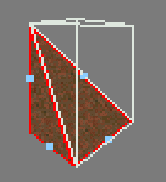
Now, clip it, and see what it looks like. If
you've done everything right, you should see something like this in
the 3D preview:
Shape Two: Tapered Cylinder
For this shape, look at the sample map
here to see the objects described.
Start with the brush on the left in CYLINDER.MAP, which can be created
with simple 2-point clipping. This brush is a vertical 8-sided cylinder,
with the top tapered along the x and y axes. However, the faces that are
along a 45-degree angle aren't tapered. The brush on the right is the
finished product we're going for, just for reference.
Here's
the view of these brushes from the top:
Here's how to turn the brush on the left into the brush on the
right:
- Start with the upper-left corner. Place two clip
points, the first at the left end of this edge, and the second at
the right end of this edge. As you place them, think "1 down, 2
down". Now, look at the brush on the right to see what the
top-down view of this face will look like when it's done, and place
a 3rd point at the next vertex of the face, and as you place it,
think "3 up". So, you have 1down, 2down, 3up.
Here is a shot of the clip points as they
should appear in the Top View:
- Go to a side view. Drag points 1 and 2 directly
up/down so that they are 32-units from the top of the brush, the
relative "down" position. Next, drag point 3 so that it's
at the top of the brush, the relative "up" position.
Here is a shot of the clip points as they
should appear in the Right View after you have dragged them:
- Clip, and voila, there's one tapered face!
Now, there's two ways to clip the rest of the
faces. The way I suggest you use now to get practice is to just repeat
the above steps for the other three, keeping in mind that you're
clipping the top off the brush, or rather, you're keeping what's below
the clip plane. So, you need to place the points in clock-wise order.
The other way to do it is MUCH faster, and it involved using the
3D view, the "Set Clip Plane From Face" function (check your
bspmou3d.ini to see what it's set to, if anything), and the "90-degree
rotate about z" button. See if you can figure it out.
This is a little tricky, so I'll help you out.
First of all, select Preferences/Mouse from the File Menu. Under 3D
settings, select 'Clipper'. This turns on the mouse Clipping functions
in the 3D window. Now go to the 3D window and move around until you can
see the face that we just clipped off (the first tapered face).
Right-click on this face. BSP forms a Clip Plane from this brush
face. Now, switch to the Top X/Y view (just so you can see what's going
on). Click on the 'Rotate on Z' button. The brush rotates, but the Clip
Plane stays where it is! Now click on the Carve button and voila! You've
just carved the second plane at the same angle as the first. Repeat
these steps for the other two faces and you're done! That is really
powerful!
Other shapes: In
othershapes.map,
I've made a little hallway with some other shapes created with the
3-point clip plane. See if you can re- create it.
Good
luck!
Well, there you have it. I really
want to thank Gripp for taking the time to do this tutorial. I hope you
have found it as useful as I have. I have to admit, I even learned
something new (the 3D mouse clipping trick). I guess you can show an old
dog new tricks after all... :-) Take it easy!
This site is designed for 800x600 resolution, and is best
viewed in Netscape 4.0 or above with 16bit color or higher.
BSP is the sole creation of
Yahn Bernier. I am only a
dedicated user, reporting news and making tutorials so Yahn can spend more
time enhancing BSP.
This web page was created and is being
maintained by me (DeadMeat). Unless otherwise noted, all content appearing on this site
was written by me. Also, 'DeadMeat's BSP Tutorials' were created entirely by me. All unauthorized use is
prohibited. (c) 1997. So there :-P