Lesson 9 - Advanced Texture Manipulation
BSP includes some really useful texture
manipulation features that make aligning/copying textures really easy, especially
when you are trying to get your level to look 'just right'.
This lesson will show you how to use these features.
To get started, we need something to texture. We
aren't going to compile anything, so we don't need to make a complete
room, but let's make a couple of brushes. Fire up BSP and select 'New'
from the File menu (or click the 'New' toolbar button). Make two
rectangular brushes side by side, a little ways apart. The textures
you use don't matter, just make it something you can see really well.
When you get your brushes drawn, switch to the 3-D window and turn on
texture rendering.
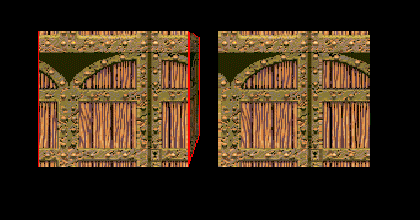
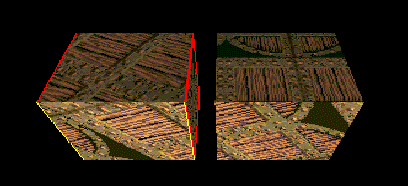
Here's what my screen looks like in the 3-D texture
view at this point:
Right-click on the title bar of the 3D window and
select 'Display Settings' from the context menu which appears. A help
window for 3-D mouse settings appears. Look this list over. If you don't like
the way these buttons are laid out, you can change them to be
anything you want. I'll show you the default settings, but if you edit
the file BSPMOU3D.INI (in your BSP\SETTINGS directory), you can changes these
to work however you would like them to. I chose to leave mine at the
default settings, so let's play around and see how this all works.
First, in case you're not familiar with the 4 left
button options, I'll run through what they do. Left Click on a brush
to select it. The face you click on becomes the currently selected
face (outlined in yellow as opposed to red).
Shift-left click and hold while you move the mouse
around. The texture drags around with the movement of the mouse. This
is handy for aligning textures on odd-shaped brushes. Depending on
which direction you are facing and which face of the brush you are
aligning, sometimes the texture may move opposite of the direction you
move the mouse. This is okay, you just need to be aware of it. It's
nothing you're doing wrong. As you move the texture around, the S and
T settings are displayed in the Status Bar
so you can see how far you've moved the texture.
Ctrl-left clicking and dragging the mouse stretches
the texture and updates the SX and SY values, thus stretching (a value
greater than 1.0) or compressing (less than 1.0) a texture. This
allows you to make a texture fit a brush that may not be quite as big
as the texture you are applying. If you've ever wanted to flip a texture
so that it is reversed, simply Stretch it to a -1.0 value.
Ctrl-Shift-left click and drag rotates the texture.
The rotation value (R) is displayed in the status bar as you
drag.
Note that so far, all these have changed is the
currently selected face. What if you want to change the entire brush?
Well, read on...
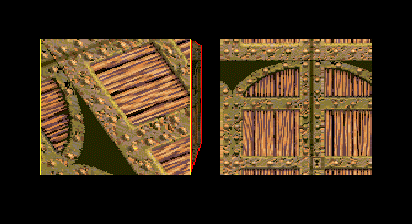
I played around with the texture on one of my
brushes. I stretched it and rotated it a little so you could really
see a difference. Now it looks like this:
Let's say I want to make a face of the other brush
look the same way. It's real easy. When you get the face aligned just
the way you want it, right click on it. This lifts the texture from
the face you click on and saves it in memory.
Ignoring the second brush for a moment, let's say
we wanted to apply this texture to all the faces of the current brush.
Shift-right click lifts the current texture and applies it to all
faces of the current brush. Try it if you don't believe me. Now, sure,
you could have gone over to the texture window and put these settings
in manually and hit ALT-F, but isn't this a lot easier?
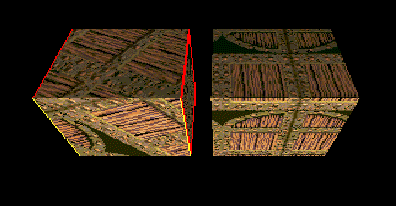
Here's a little different view after I applied this
texture to all the faces of the first brush:
Now to make our other brush look the same, simply
Ctrl-Shift-right click on the face you want changed:
Or Ctrl-right click (no shift) to apply this to all
the faces on the second brush:

Isn't that cool? With just a few clicks of the
mouse, you're in full control of textures on any face or brush you
want. Notice also that as you are applying the textures to the second
brush, the first brush/current face remains selected, allowing you to
continue manipulating it after you are done applying the texture to
any other brushes you might want. (In fact the face you are manipulating
doesn't even have to be selected!)
Practice this a little bit and pretty soon you'll
be aligning textures like the pros. Now there won't be any more
excuses for not having textures aligned on those odd-shaped brushes.
:-)
Well, that wraps up this lesson. Hope you found it
useful. Thanks for stopping by my little corner of the web.
This site is designed for 800x600 resolution, and is best
viewed in Netscape 4.0 or above with 16bit color or higher.
BSP is the sole creation of
Yahn Bernier. I am only a
dedicated user, reporting news and making tutorials so Yahn can spend more
time enhancing BSP.
This web page was created and is being
maintained by me (DeadMeat). Unless otherwise noted, all content appearing on this site
was written by me. Also, 'DeadMeat's BSP Tutorials' were created entirely by me. All unauthorized use is
prohibited. (c) 1997. So there :-P